Often when digital audio theory is discussed it is from a technical point of view (and sometimes from an aspect of its perceived value vs. the analogue domain). However, in this article, I’d like to look at sample rates and how they relate to time. This is of course part of the underlying science of the digital domain but I’ve not come across it very often in discussions on practical sound design and audio processing implementation.
So why discuss sampling rates and time rather than frequency? That’s a valid question and if your intention is to understand the theory of how analogue audio is transferred to digital form then frequency is the way to go and for that I recommend Monty’s videos over at Xiph.org and for implications of digital audio I suggest checking out Dan Worrall’s Youtube channel. But in practice time can have some implications that can be easily overlooked and cause some intense head-scratching but also be a good way of understanding when and when not to use higher sample rates in your creative work.
The many ways of the crossed zero
It’s common to use high sample rates such as 96 or 192kHz when designing the sounds but then need to convert to a lower rate, usually 44.1 or 48kHz, for their further use, be it in-game audio, film or music. While most game audio middleware or post-production sessions are fully capable of dealing with samples with high sample rates it’s often impractical as it slows down transfer times, blows up session folders and requires a much higher CPU processing workload. But when converting sounds to a median rate in a project time is a factor and one example is moving zero-cross points.
The below image shows a zero-crossing point in an audio file where the amplitude of the wave is at 0 dB and there’s no voltage present allowing for a clean edit without any resulting clicks.

The audio loop in this next GIF has been edited so both the beginning and end of the audio file are terminated at a zero crossing This type of loop is referred to as a seamless loop or sometimes a VGM or video-game-music loop.

Here’s the audio.
This is the same loop but re-sampled from 96kHz to 48khz…not so seamless anymore…
Lost points
Here’s an image that visualises the problem. The top file is the original at 96 kHz and the bottom file is the rendered 48 kHz version where it’s evident that there’s a gap of silence at the end of the clip causing the loop turnaround to audible click.

So what has happened here, terrible converters, bad render algorithms or just your average computer gremlins?? Nope, time has happened here and some basic subtraction. As illustrated in the next image the first file has 96.000 sample points per second and the rendered file 48 so that’s a difference of…… yup, 48.000. In the next image we can visibly see that there are less points in the wave.

But the points still needs to occupy the same amount of time so the conversion process spreads the sample points across the length of the audio clip, for more on how that magic works, I highly recommend Akash Murthy’s tutorial series.
Practically this means that you should render files to the intended application sample rate before creating seamless loops and always create fade-ins and fade-outs on audio clips intended to be down-sampled even though they may not present a problem at the higher sample rate.
Getting the right tone
Time also plays a factor when manipulating the fabric of reality. Or in more worldly terms, changing the time and pitch of an audio file. When applying that type of processing in a DAW or audio editing software it might not be immediately obvious what needs to happen for the result to be satisfactory to our needs especially when shifting the pitch of the audio.
In this example, this 48 kHz audio file has been set to play back at 11025 kHz but without using a pitch shift algorithm, instead, the file is simply being played back using fewer points.
Playback at original 48kHz

Playback at 11025 kHz.

As the audio in these images has not been converted using a pitch-shifting algorithm the longer duration of the audio in the second image is simply a result of the file playing back the same amount of content at a much lower rate causing the pitch to lower.
This occurs due to the relationship between sample rate and playback speed. When we record audio, the sample rate determines the number of samples taken per second. At a normal speed that relationship is one-to-one (44.1kHz at 44.1kHz) but dividing this rate means covering the same number of samples but with only (in this case) 11,050 points per second available to us, hence the playback time will be slower.

Or take a bike ride.. if you cycle a mile at 15 mph then to cover a mile will take you 4 mins (ish), to cover the same distance at 7.5 mph will take double the time.
But lowering the pitch of material by playing it back slower isn’t very practical (although it can be very cool sonically) so most of the time we want to retain the length when we lower the pitch and this is where this extra amount of frequency content comes in handy.
In practise
So to make it more obvious that both pure tones in the following examples are sweeping over the same range I’ve re-sampled both of them from their original rate (48 vs. 96) to 11050 kHz. Beware it gets pretty loud.
As discussed earlier in this article the audio with a lower sample rate plays through faster than the other.
But both of these are playing back the lower pitch by slowing the speed so instead let’s use a pitch shifting algorithm. Both files have had a -24 semitone pitch shift process applied and below is the visual and audible result of that process.
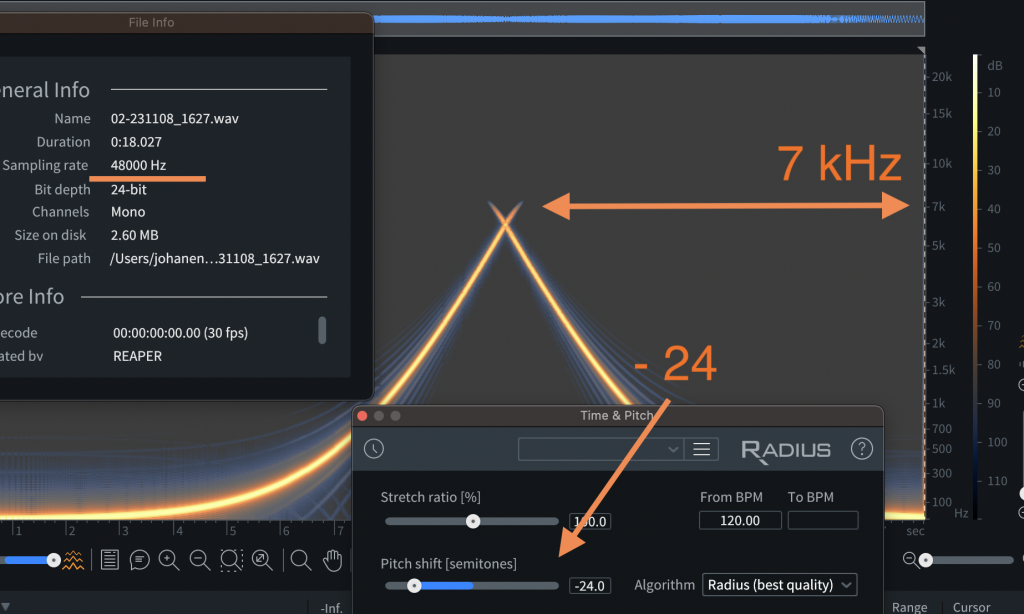

Original sample rate 48 kHz
riginal sample rate 96 kHz
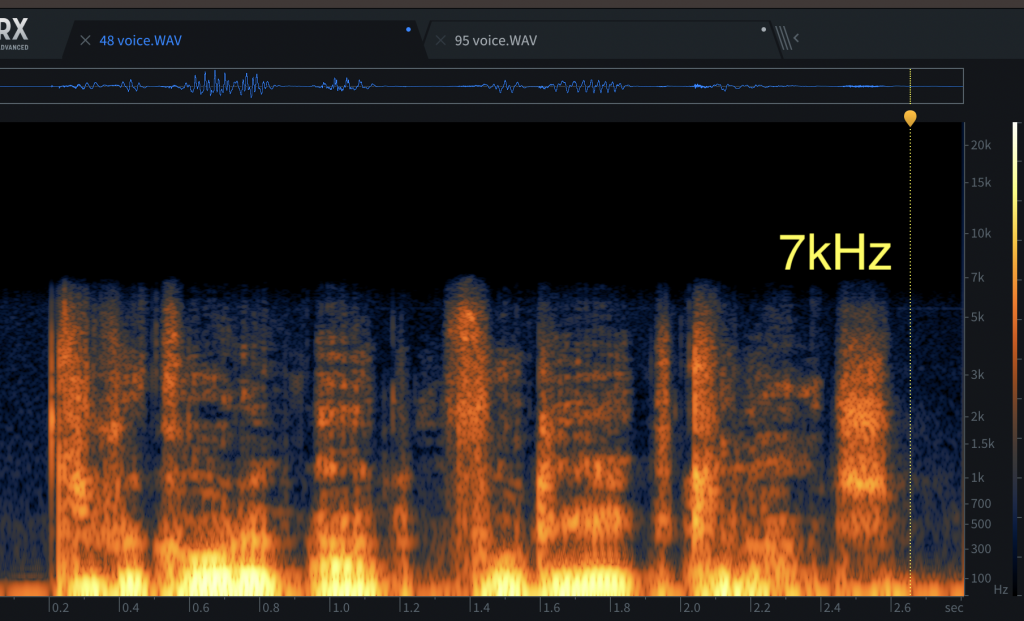
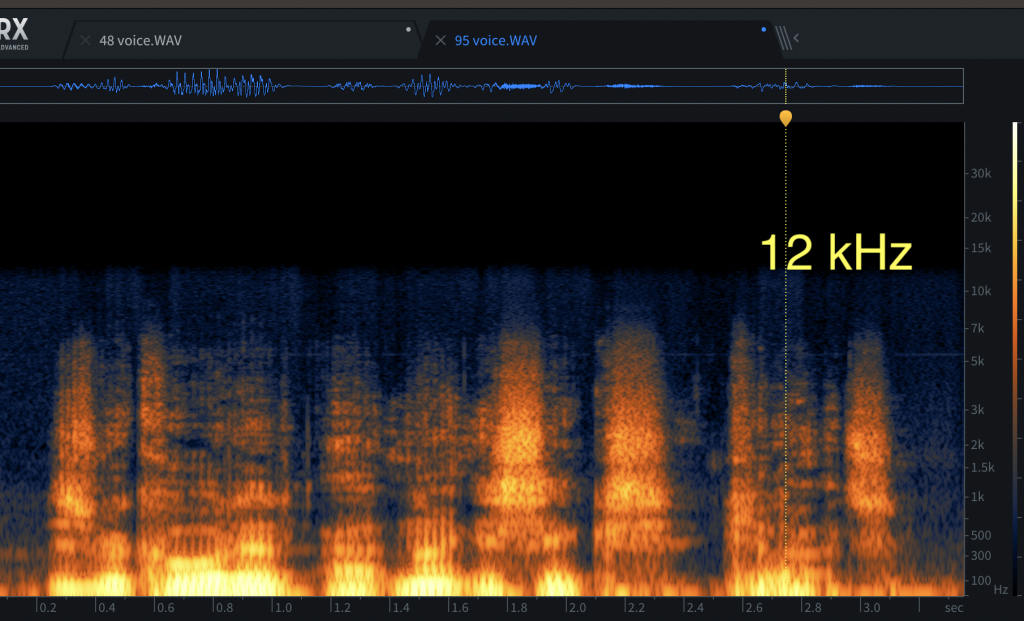
And here are two vocal recordings for comparison.
And here are the spectrograms of these vocal recordings following a -24 semi-tone pitch shift processing starting with the 48 kHz recording followed by the 96 kHz.
A short summary
For sound design, there’s a clear advantage of using material recorded or created at higher sample rates if the intention is to process further using pitch or time-stretch. However, at the same time, this workflow has as discussed some drawbacks and should probably not be thought of as a must for all creative audio design. Hopefully, this article has been helpful and given some guidance on when it’s useful to work at higher sample rates and what to be mindful about in that process.
Leave a Reply